Food hacks and cheat sheet for camping
South Africa
Self-catering guide for camping in tents, caravans, RV’s and accommodation
Food list that can be used anywhere, not just South Africa
Includes a few of our favourite recipes for camping
Stress free planning of meals
Food is an integral part of living. This also holds true when we travel. Eating at restaurants is a treat but can stretch the budget, especially if you are on the road or away for lengthy periods.
Many of us choose to self-cater when we have the option in accommodation, or when camping, caravanning and even road tripping in an RV or motorhome.
Cheat sheets and camping hacks make my life easier when I am packing and preparing for our trips. Naturally I have a food list as well which eliminates or reduces the stress.
I consider the type of trip we are going on and plan our meals accordingly. If we are active or on the road continuously many of my meals are quick and easy, with some forethought and preparation ahead of time.
If there is time to sit around a campfire to relax and chat, then we indulge and take time to prepare and cook food.
Consider the weather and location of your campsite. Wind and campfire cooking don’t always work together. Rain is sometimes less of an issue if you have some form of shelter where you can make a fire or have a stove.
Hot tip:
Camping wind shield or plates, preferably adjustable, are a necessity for a camp stove when it is windy.

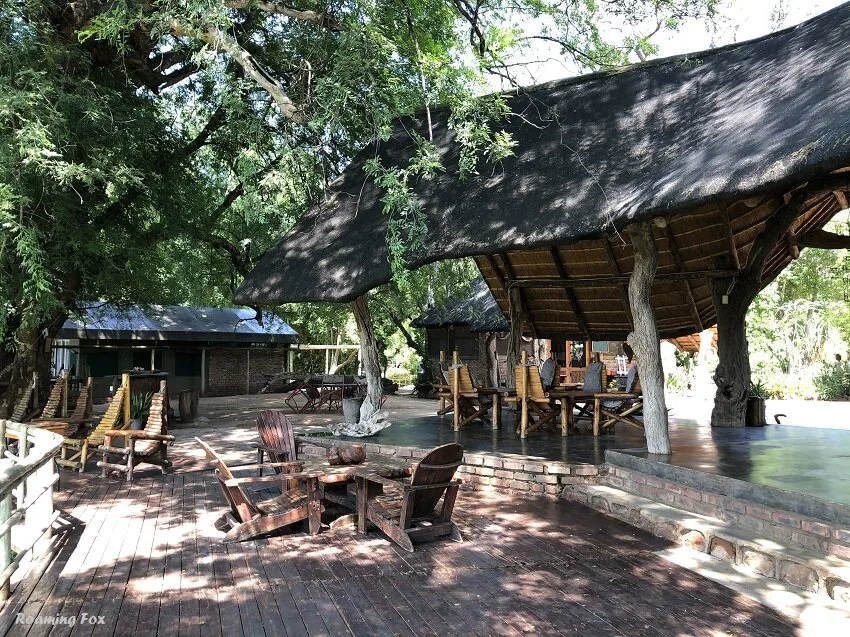
Campfire cooking at an off the grid campsite in Botswana
“Potjiekos
A South African aromatic stew cooked over the coals in a 3 legged black cast iron pot”
Simplicity is the key.
Do you want to relax or spend time with elaborate cuisine? That is your choice. Don’t get me wrong; I love cooking but most of the time when we are traveling I like to spend time exploring or enjoying the area, not cut huge portions out of the day having to prepare intricate meals.
Likewise with washing up afterwards. If there is a scullery, sometimes it is a fair distance from your campsite. Walking is not the issue, it is the leaning tower of Pisa, balancing all the pots, pans, crockery and cutlery in your washing up bowl. Invariably that tower collapses and stuff ends up in the dust.
Are camping fridges worth it?
Are you camping near a supermarket, shops or a fresh produce market? No problem. You can plan meals with fresh ingredients and replenish regularly. Remote camping requires more planning but there is no need to live off empty calories when camping.
If you are fortunate to have a camping fridge or freezer then you will have the ability to keep food cold or frozen. This also allows you to camp for longer periods without needing to constantly restock. If you are at a remote location you may not be able to find food or even ice.
Our camping fridge and freezer has been one of the best investments added to our camping equipment. Bear in mind though, that space is still limited inside.
If you have a cool box you can keep food frozen for a short period or even cold if you can keep the interior cool with ice bricks.

Coffee and roosterkoek - an all time favourite in South Africa
What food to pack when you camp?
If you have no fridge, freezer or cool box, do not despair. Dehydrated foods or pasta, gnocchi and canned or bottled sauces or tins of your all-time favourites and soups come in handy.
Plan to eat perishables first. Try to stack your frozen food in the order that you're going to eat it. If possible only open the freezer once a day to take what you need, especially on scorching days.

A cool box and a picnic cool bag
Hot tip:
On camping trips I always take a picnic basket or bag with a few mugs, glasses, a flask for boiling water, a couple of small, long life juices, tea, coffee and 250 ml containers of long life milk. Handy for those drives e.g. when on self-drive safaris or stopping somewhere for a picnic. Don’t forget to pack a few snacks as well. One more thing, don’t forget a teaspoon!

A simple but delicious lunch when we camped in Mozambque
Basic foodstuffs to take camping:
Free printable or downloadable template of camping food list included
I use this list as a guideline for what we need. You can adjust or add to it according to your necessities.
1. Beverages
Pack your beverages of choice. We pack tea, coffee and Milo or Ovaltine (Bournvita) for those cold winter evenings. Cooler drinks such as juice, cold drinks and if necessary water. If you enjoy drinking them, some alcoholic beverages of your choice. We usually pack wine, gin & tonic or beers and cider.
2. Dairy Products
Milk - fresh or long life milk, yoghurt, cheese and butter. The advantage of using long life milk – it does not need to be refrigerated until open so is useful for traveling to remote places.
3. Cereals/Starches
But first coffee. When camping with our first cup of coffee in the morning we often have rusks. It is such a South African tradition. Sometimes we buy, sometimes we bake.

An iconic rusk brand in South Africa and early morning coffee at Storms River Rest Camp - Bliss!
Generally we eat muesli, fruit and yoghurt for breakfast but you can pack your own choice of cereals or alternatives for breakfast. On occasion we splash out and cook up a brunch with eggs, bacon, chipolatas, tomatoes and sometimes mushrooms.
Pasta is one of the most versatile starches for camping trips. Add any choice of sauce to it and it will fill many a hungry tummy. Gnocchi is a great substitute for potatoes, if you have run out or want a variety. We have even used it as a substitute for mashed potatoes over Cottage Pie.
Rice is a great filler and addition for stews or chicken.
Stir fry noodles come in handy if you want to make a quick meal or a Thai curry.
Bread or rolls are great for a quick lunch and if bread is unavailable, savoury biscuits or crackers are a handy substitute.
Pre-packaged crumpet/pancake mix are convenient and a great treat when camping. Add your own topping of choice.

Chicken schnitzel cooked in a skillet over coals
4. Protein/Meat
Eggs, bacon, chipolatas are great for those fry ups or even for a quick lunch.
South Africans are fond of eating meat so we often grill over the open coals. As a result we pack meat, chicken, sausages and mince depending on the quantity of meals required.

Roasting a leg of lamb in a flat bottomed cast iron pot
5. Cans and jars
Cans, jars and even sachets are great standby’s if you cannot pack fresh produce. There is a large selection of pasta sauces such as Alfredo, mac & cheese, etc. available in shops.
Cooking sauces such as Thai Curry, bolognaise, sweet & sour, are handy for those quick meals.
Tomatoes in any form, canned or in sachets, whether chopped, pureed or pastes or sun dried.
An alternative to meat or chicken is beans, lentils or chickpeas.
Beetroot salad in a jar is a convenient and quick salad.
We prefer eating fresh fruit but canned fruit can be a great substitute if none is available.
Canned tuna, sardines, salmon are handy for lunches or quick dinners.
Olives are a great snack or for adding in pasta sauces as well as into a salad.
You might not use pickled vegetables but they do come in handy if you do not have a camping fridge or freezer or have no fresh supplies.
Sweetcorn and baked beans are great standby’s when you need to fill hungry tummies.

Pre packed spices, measured and ready to add to your particular dish - handy for camping when you don’t want to pack your entire spice cupboard.
Just follow the instructions on the back of the box.
6. Sauces and condiments
If you like using sauces at home, pack at least some of them such as tomato sauce, chutney and mayonnaise.
Everyday basics such as oil, vinegar or lemon juice, marinades & salad dressings.
Salt, pepper, herbs & spices that you usually use.
Soy sauce or stir-fry sauces.
Jam/honey/sugar if you like something sweet.
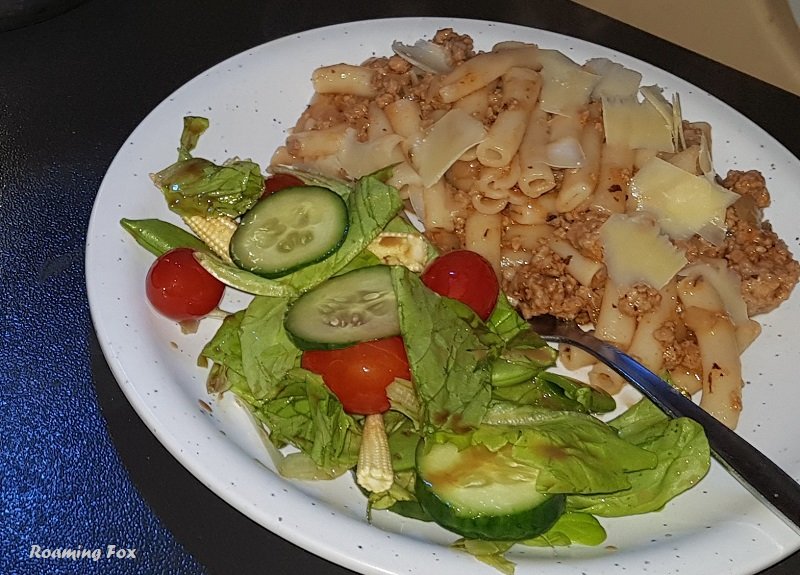
A quick pasta and salad dinner
7. Fresh Vegetables and Fruit
Pack vegetables like butternut, carrots, onion, garlic, potatoes, sweet potatoes that do not spoil quickly. Softer vegetables such as lettuce, cucumber, tomatoes or avocados often spoil easily (or freeze if your fridge temperature is set too low) as they do not travel well. If you still want to pack them, do so carefully with some cushioning around them or in a container.
Other vegetables such as cabbage, broccoli, spinach, cauliflower can be packed but bear in mind the size of your fridge or cool box.
Apples, oranges and other fruit of choice. Bear in mind once again which ones do not travel well.
Dried fruit is another great substitute if you cannot obtain fresh fruit.
8. Snacks
Pack your snacks of choice such as nuts, crisps or pretzels. A favourite in South Africa is biltong (jerky) and droewors (dried sausage).
Other snacks we usually pack are rusks to have with that early morning coffee, biscuits, and sometimes fruit cake or muffins.
Don’t forget a couple of sweet treats as well.
In addition to this list you can add your favourite items of food that you think will be appropriate for a camping trip.

Bobotie and yellow rice - A traditional South African Cape Malay dish done in a flat bottomed cast iron pot over the coals
Hot tips and hacks for camping cuisine
If you use mince, prepare it in advance at home such as curried mince, bolognaise or savoury mince. Pack them in serving sizes and freeze. Take out what you need and defrost at your campsite. Heat, adjust flavouring and add to your favourite accompaniment such as pasta, rice or potatoes.
Pulled pork is another go to favourite. Prepare at home and freeze as you have done for the mince. Once again add to your favourite starch or vegetable.
On occasion I have even cooked the meat for a stew with onions and flavouring. Once again I freeze it in serving size and defrost at the campsite. To finish off the meal, I cook the vegetables such as potatoes, carrots, green beans etc. until just about ready, add the stewed meat, adjust the flavouring and heat through thoroughly.
Stir fries or if you like Thai curries are other quick meals to make, especially if you have some chicken or meat and a few vegetables. A protein substitute of course is tofu, nuts, dried or canned beans or chickpeas.
Don’t pack your biggest containers of sauces or mayonnaise jars, unless you have the space in your fridge to store them. I often decant into smaller containers. Square or rectangular containers are also better than round or oval ones.
Avocados don’t always travel well although I have packed them on occasion. Because I have a camping freezer I make guacamole and mix in lime or lemon juice to prevent it from going brown. You can also buy ready made guacamole. I then freeze it and use it for spreads at a later stage during our camping trip.
Whatever you cook in your oven at home you can cook over the coals in a cast iron pot, with a bit of planning or forethought. We have made stews, roasts, curries, lasagne or moussaka. We have baked bread and friends of ours have even baked a cake. Keep an eye on your coals underneath, and don’t place the pot too close to prevent burning. Place a few coals on the lid if you want to ‘brown’ the top. Keep adding another coal or two periodically to keep the temperature constant.
Involve your children with campfire cooking and keep them occupied at the same time. Everyone knows the all-time favourite, roasting marshmallows and making S’mores. Lots of fun! In fact, kids love skewered food. Cooking sausages on a stick or even campfire bread on a stick are other favourites. Recipe below for the bread!

Roasted marshmallows and melted chocolate sandwiched between two biscuits - yum!
If we are camping in a big group or are a few families we take turns to make the main meal of the day for the entire group. We usually liaise and decide before the trip so we don’t make the same thing.

One of my favourite meals - stir fry with noodles
Hot tip:
If you are using a cast iron pot for browning meat or onions, heat well over a flame before placing over coals.
With this downloadable, printable food list and cuisine hacks, catering for your camping trip should be hassle and stress free. Can you think of any tips or tricks? Please let me know. If you have any questions, don’t hesitate to ask!
Recipes for Camping
Bobotie – a traditional South African Cape Malay dish and an all time winner
Ingredients
500 g beef mince
1 onion
1 large clove garlic
1 teaspoon chopped/minced ginger
1 – 2 tablespoons Oil
½ teaspoon turmeric
1 tablespoon roasted masala (or own mix of curry spices)
1 tablespoon apricot chutney
1 teaspoon vinegar
Salt to taste
2 – 3 bay leaves
½ cup milk
2 eggs, beaten
Method
Heat oil on medium heat and sauté onion till golden brown. Add mince, garlic and ginger and braise for a few minutes. Add spices and sauté for approximately a minute. Add about ½ a cup of water, a little at a time, plus vinegar, salt and chutney. Simmer for 30 minutes, stirring occasionally. It must not be too runny. If you have cooked this in a cast iron pot, whisk the eggs and milk together and pour over mince. Stick bay leaves into the mince. Place lid on the pot, place a few coals on top of the lid and bake over the rest of the coals for about half an hour, maybe a little longer. Add a coal or two to keep the heat constant.
If you are cooking this in an oven, place in an ovenproof dish, add the milk and egg mixture and bake at 180 degrees C for half an hour.
Serve with white or yellow (traditional with turmeric & raisins) rice and vegetables or tomato and onion sambal.
Serves 4 to 6
Recipe Card to download on Pinterest
Bobotie

Campfire bread on a stick
Ingredients
2 cups of flour – all-purpose
2 teaspoons baking powder
5 tablespoons sugar
1 teaspoon salt
¼ cup oil (olive or sunflower)
⅔ cup water
Method
Mix the flour, baking powder, sugar and salt in a bowl. Add the oil and water and mix the dough until it is smooth.
Divide into about 12 even sized balls and roll each ball into a thin cord or string. Wrap or coil around about a quarter to a third of the end of a clean, sturdy, thin and long enough stick (for safety).
Place the end of the stick over coals (not direct flame), or even on a grid. Rotate it regularly so that the dough cooks evenly and does not burn. The bread should take about 5 minutes to cook.
Serve immediately with butter or topping of your choice.
Ideas: Dip into jam or chocolate spread. Alternatively sprinkle with cinnamon sugar or place cheese sticks or cheese spread in the hole where the stick was.
Recipe Card to download on Pinterest
Campfire Bread on a Stick

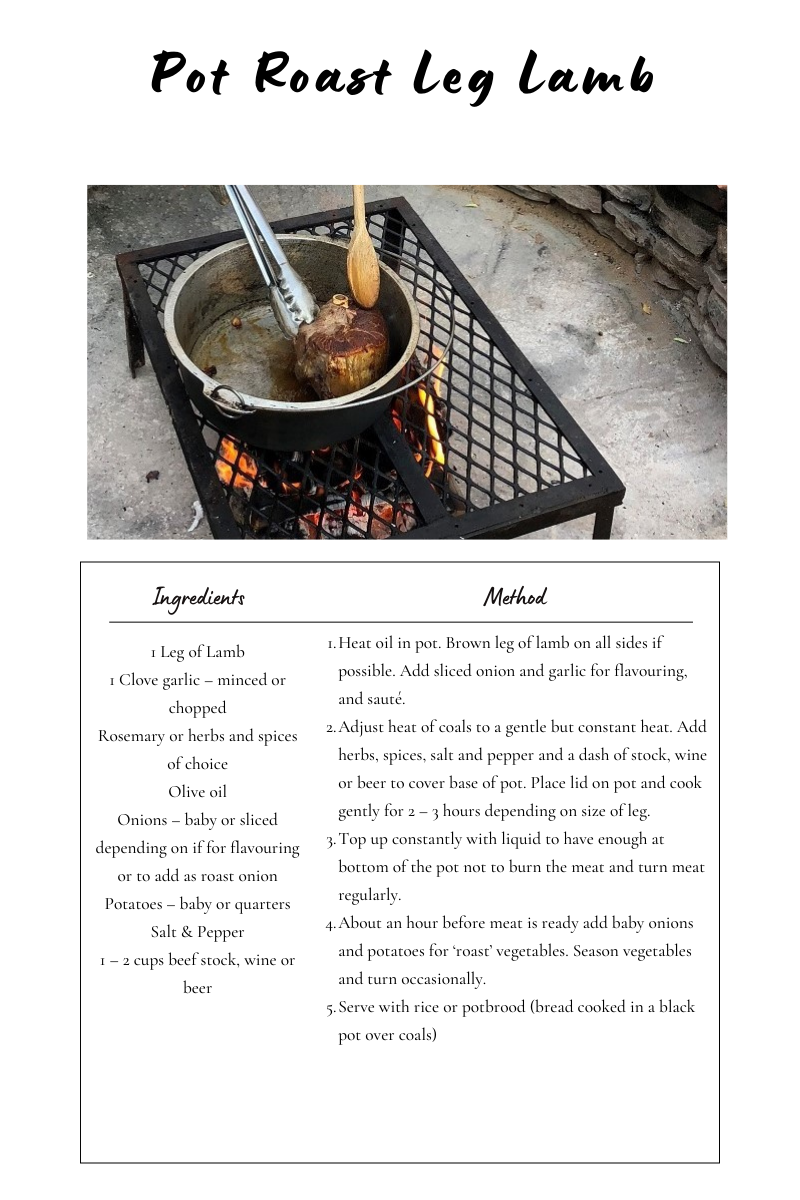
Pot Roast Leg of Lamb
Ingredients
1 Leg of Lamb
1 Clove garlic – minced or chopped
Rosemary or herbs and spices of choice
Olive oil
Onions – baby or sliced depending on if for flavouring or to add as roast onion
Potatoes – baby or quarters
Salt & Pepper
1 – 2 cups beef stock, wine or beer
Method
Heat oil in pot. Brown leg of lamb on all sides if possible. Add sliced onion and garlic for flavouring, and sauté.
Adjust heat of coals to a gentle but constant heat. Add herbs, spices, salt and pepper and a dash of stock, wine or beer to cover base of pot. Place lid on pot and cook gently for 2 – 3 hours depending on size of leg.
Top up constantly with liquid to have enough at bottom of the pot not to burn the meat and turn meat regularly.
About an hour before meat is ready add baby onions and potatoes for ‘roast’ vegetables. Season vegetables and turn occasionally.
Serve with rice or potbrood (bread cooked in a black pot)
Recipe Card to download on Pinterest
Pot Roast Leg of Lamb
Potbrood - an all time favourite in South Africa - bread baked in a cast iron pot.
Ingredients
4 cups bread or cake flour
1 sachet (10g) instant dried yeast
1 tablespoon of sugar
1 teaspoon salt
2 tablespoons of olive or vegetable oil or butter
1 to 2 cups lukewarm water
Method
When you are camping you don’t have all the equipment you have at home so make do with what you have. For instance you might not be able to sift the flour, so just chuck the ingredients in as directed. It is a good idea to have all ingredients measured out beforehand so that when you are covered in flour you don’t have to dirty unnecessary utensils.
Add flour to a large bowl – at least 3 times the size of the quantity of flour.
Add yeast, sugar and salt to the flour and mix together with your hands.
Add lukewarm water a little at a time and knead the dough. Make sure the dough is not too dry and equally, not too runny.
Add the olive oil or butter and work into the dough. Let it rest for a few minutes.
Knead dough again until it does not stick to your fingers. If it is too runny add a little more flour till you have the right consistency.
Cover the bowl with a damp kitchen towel, foil or cling wrap and place in a warm area. Take note that if you are camping often the dough will rise quicker than inside a building because it could be more exposed to a higher temperature.
While you are waiting, smear the inside of a cast iron pot or loaf tin as well as the inside of the lid with butter.
Back to the dough, knead for a short while then add the dough to your pot. Make sure there is space for the bread to rise when the lid is on so use a large enough pot. Halve the dough if necessary and roll the excess into round or oblong shapes. Alternatively make one rectangular shape then cut into smaller rectangular shapes.
Let the dough rise for at least 30 minutes.
In that time prepare coals for baking your bread. Bake the bread in the cast iron pot for 45 – 60 minutes.
Make sure the coals are distributed evenly below the pot and place a few coals on the lid. If the fire is too hot place the pot on a grid about the coals. If the coals die down replenish with more coals. Do not place the coals too close to the bottom of the pot as the bread will burn.
Check your bread after about 40 minutes to see if it is cooked thoroughly. If not, cook for a further 10 to 20 minutes, checking regularly. How do you know when the potbrood is ready? If it sounds hollow when you tap it, it should be cooked through. Remove from pot, allow to cool then slice and add your favourite topping.
You can also bake this bread in a preheated 180°C oven for 50–60 minutes or until cooked through.
If you have made rolls or roosterkoek, place them carefully on the grid over gentle coals, not fire. Turn regularly but gently and cook for about 15 to 20 minutes. Roosterkoek should also sound hollow when it is cooked through.
Recipe Card to download on Pinterest
Potbrood


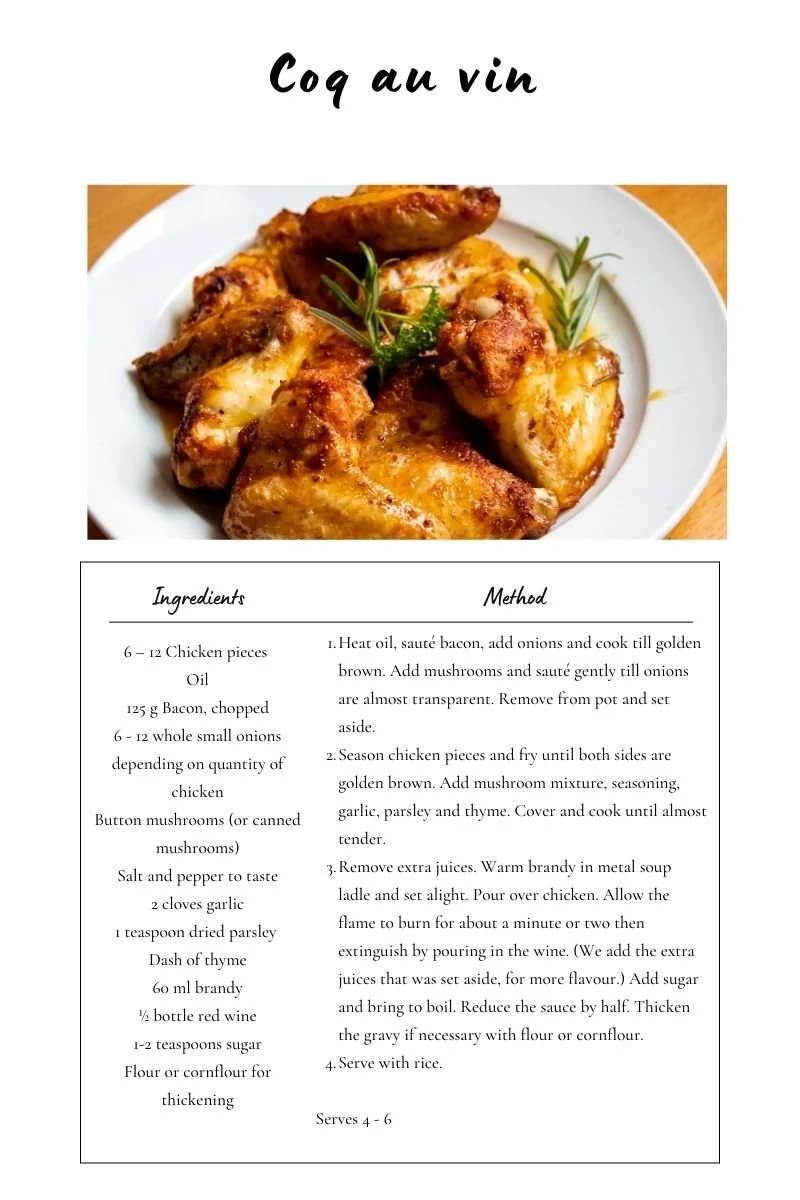
Coq au vin
Ingredients
6 – 12 Chicken pieces
Oil
125 g Bacon, chopped
6 - 12 whole small onions depending on quantity of chicken
Button mushrooms (or canned mushrooms)
Salt and pepper to taste
2 cloves garlic
1 teaspoon dried parsley
Dash of thyme
60 ml brandy
½ bottle red wine
1-2 teaspoons sugar
Flour or cornflour for thickening
Method
Heat oil, sauté bacon, add onions and cook till golden brown. Add mushrooms and sauté gently till onions are almost transparent. Remove from pot and set aside.
Season chicken pieces and fry until both sides are golden brown. Add mushroom mixture, seasoning, garlic, parsley and thyme. Cover and cook until almost tender.
Remove extra juices. Warm brandy in metal soup ladle and set alight. Pour over chicken. Allow the flame to burn for about a minute or two then extinguish by pouring in the wine. (We add the extra juices that was set aside, for more flavour.) Add sugar and bring to boil. Reduce the sauce by half. Thicken the gravy if necessary with flour or cornflour.
Serve with rice.
Serves 4 to 6
Recipe Card to download on Pinterest
Coq au vin
Find me on Social Media
On Pinterest? Pin for later.

Pin for later
Pin on Pinterest


About the Author
ALMA VAN AS | ROAMING FOX
Alma is a South African travel blogger and writer. She hopes to inspire you with facts and fables about her adventures, road trips and international travel.
Step by step instructions on how to leave a comment on my blog:
Type in your comment in the comment box.
Click ‘Post Comment’
Briefly a message should appear saying you are not logged in, then a box with ‘Post a Comment’ will appear for you to complete with your name, email address and website URL (if you have one).
Fill in your first name and email address in the appropriate section. (Your email will not be made public and will not be used for any other purpose than for you to get a notification of a reply to your comment.)
Click ‘Comment as Guest’ and you’re good to go!
To subscribe to my blogs, please fill out the SUBSCRIBE form.
Thank you.
I know it is quite a process, but it helps keep our websites secure. Your email address will not be shared or displayed.
Remote, rugged and untamed, Mana Pools is not the easiest safari destination to get to in Zimbabwe. Perhaps that is why it is the ultimate location for adventure addicts that love off the beaten track places.